How to Create a Tour
Clio is an educational website and mobile application developed at Marshall University that uses GPS to connect users to the history that surrounds them. Clio is free for everyone, with thousands of entries written by professors and their students, libraries, museums, historical societies, individual scholars, local historians, and historical societies. Each individual entry guides the public to a historical marker, landmark, building, or significant historic site. Entries include an original summary of that site and its significance, along with images and links to related primary and secondary sources.
Individuals and intuitions can create walking tours and heritage trails that connect individual Clio entries and offer directions. While walking tours should be less than three miles and include entries for each site of historical significance along the route, heritage trails cover a larger territory and might focus on a very specific theme such as women’s history or the Civil War. Heritage trails usually cover a much larger geographic area than a walking tour and they often serve as an educational resource for users who click through each entry rather than physically traveling to each location on the trail.
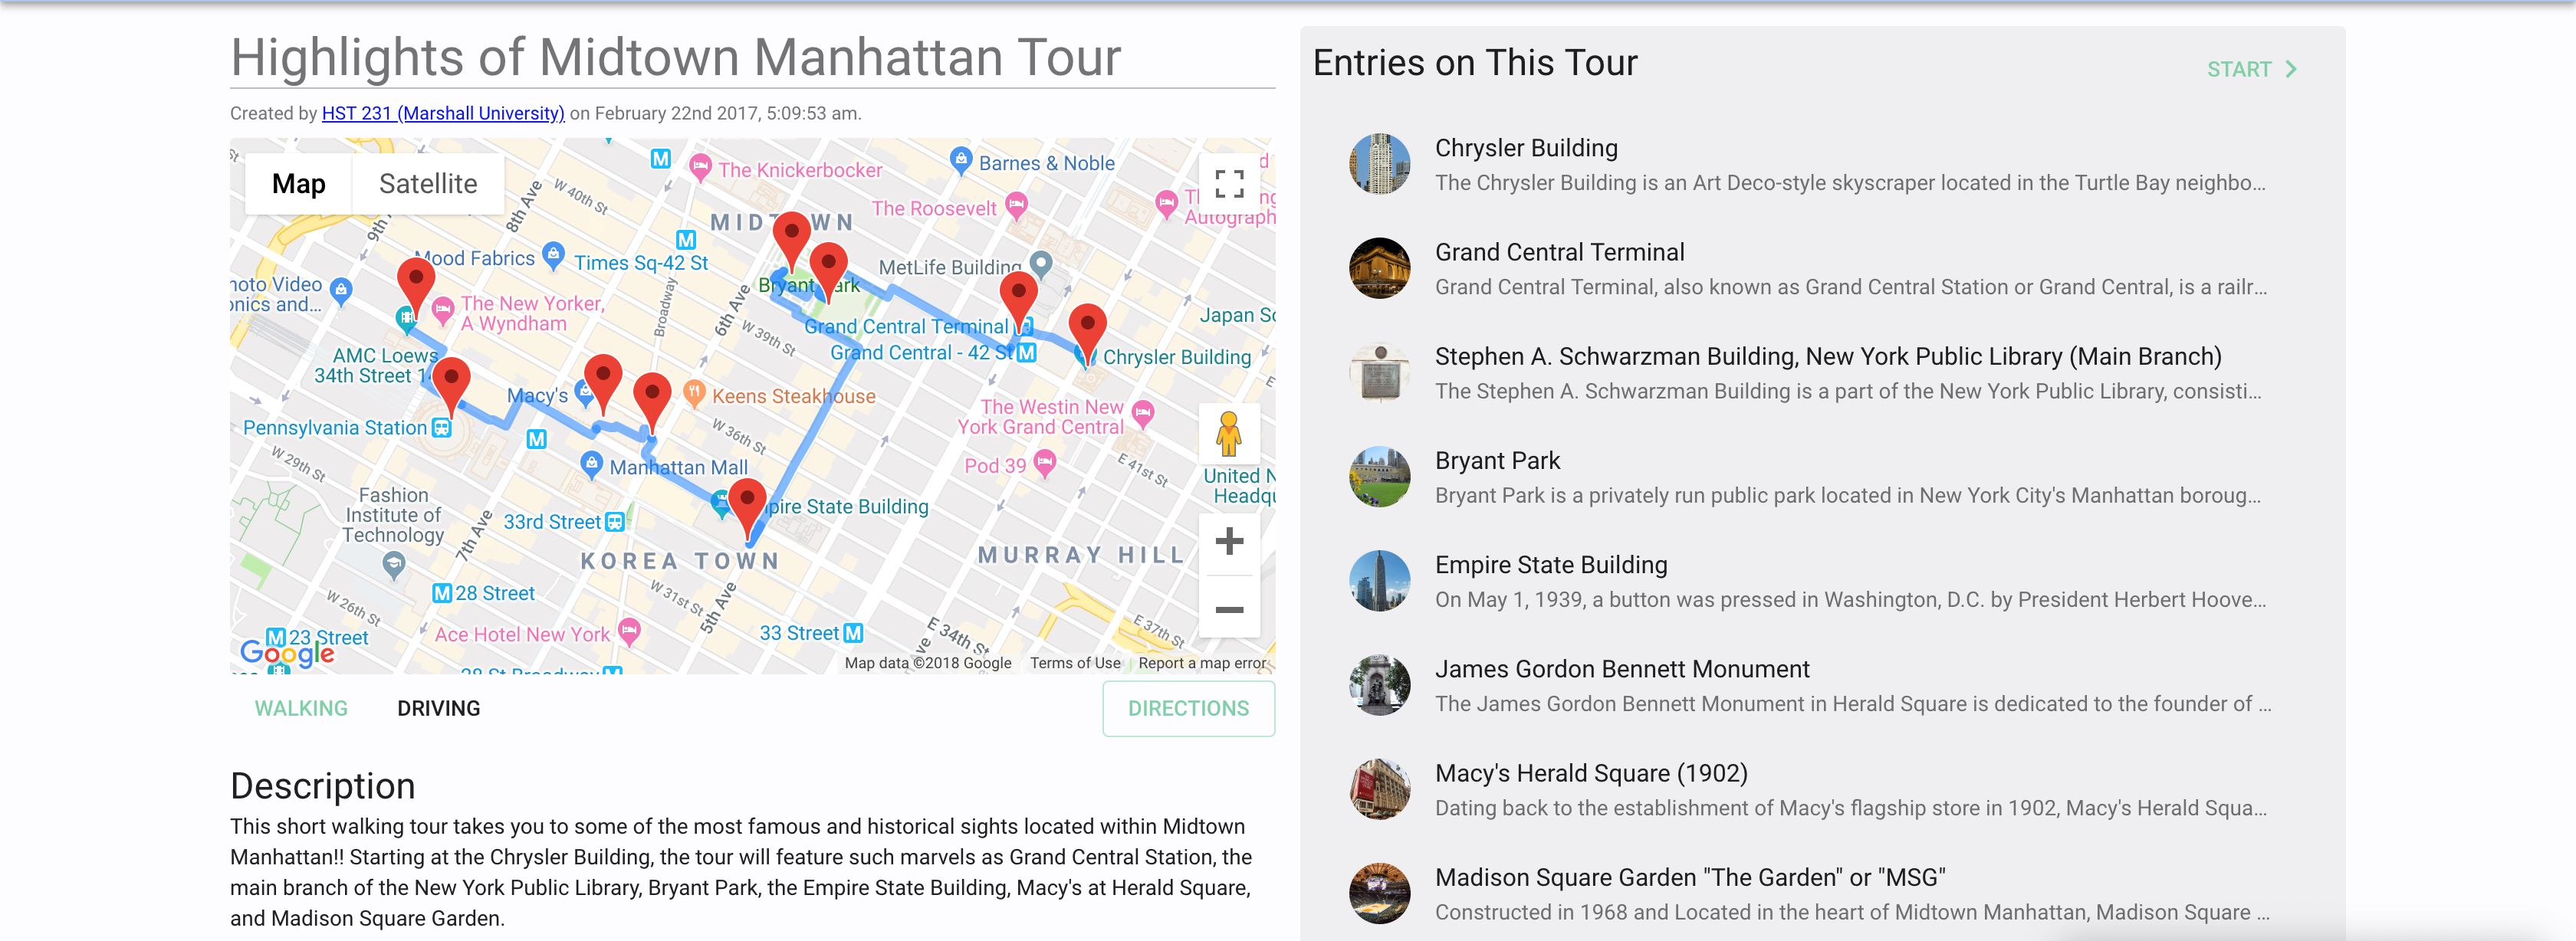
This is an example of a historical walking tour in New York City that includes entries for each historic theater along the route. Each entry includes an original and concise history along with images, media, and links to more information. By using Clio, anyone can experience this tour from any location. They can also follow this walking tour if they are in New York and receive turn-by-turn directions.
HOW CAN I CREATE A WALKING TOUR OR HERITAGE TRAIL? The first step is to identify and create a list of monuments, buildings, markers, and other landmarks that should be included in the tour or trail. Some of these sites might already be in Clio, and you can always edit and improve individual Clio entries in addition to creating new entries for sites that were not already listed in Clio. After you are satisfied with each entry, creating the tour or trail is simple.
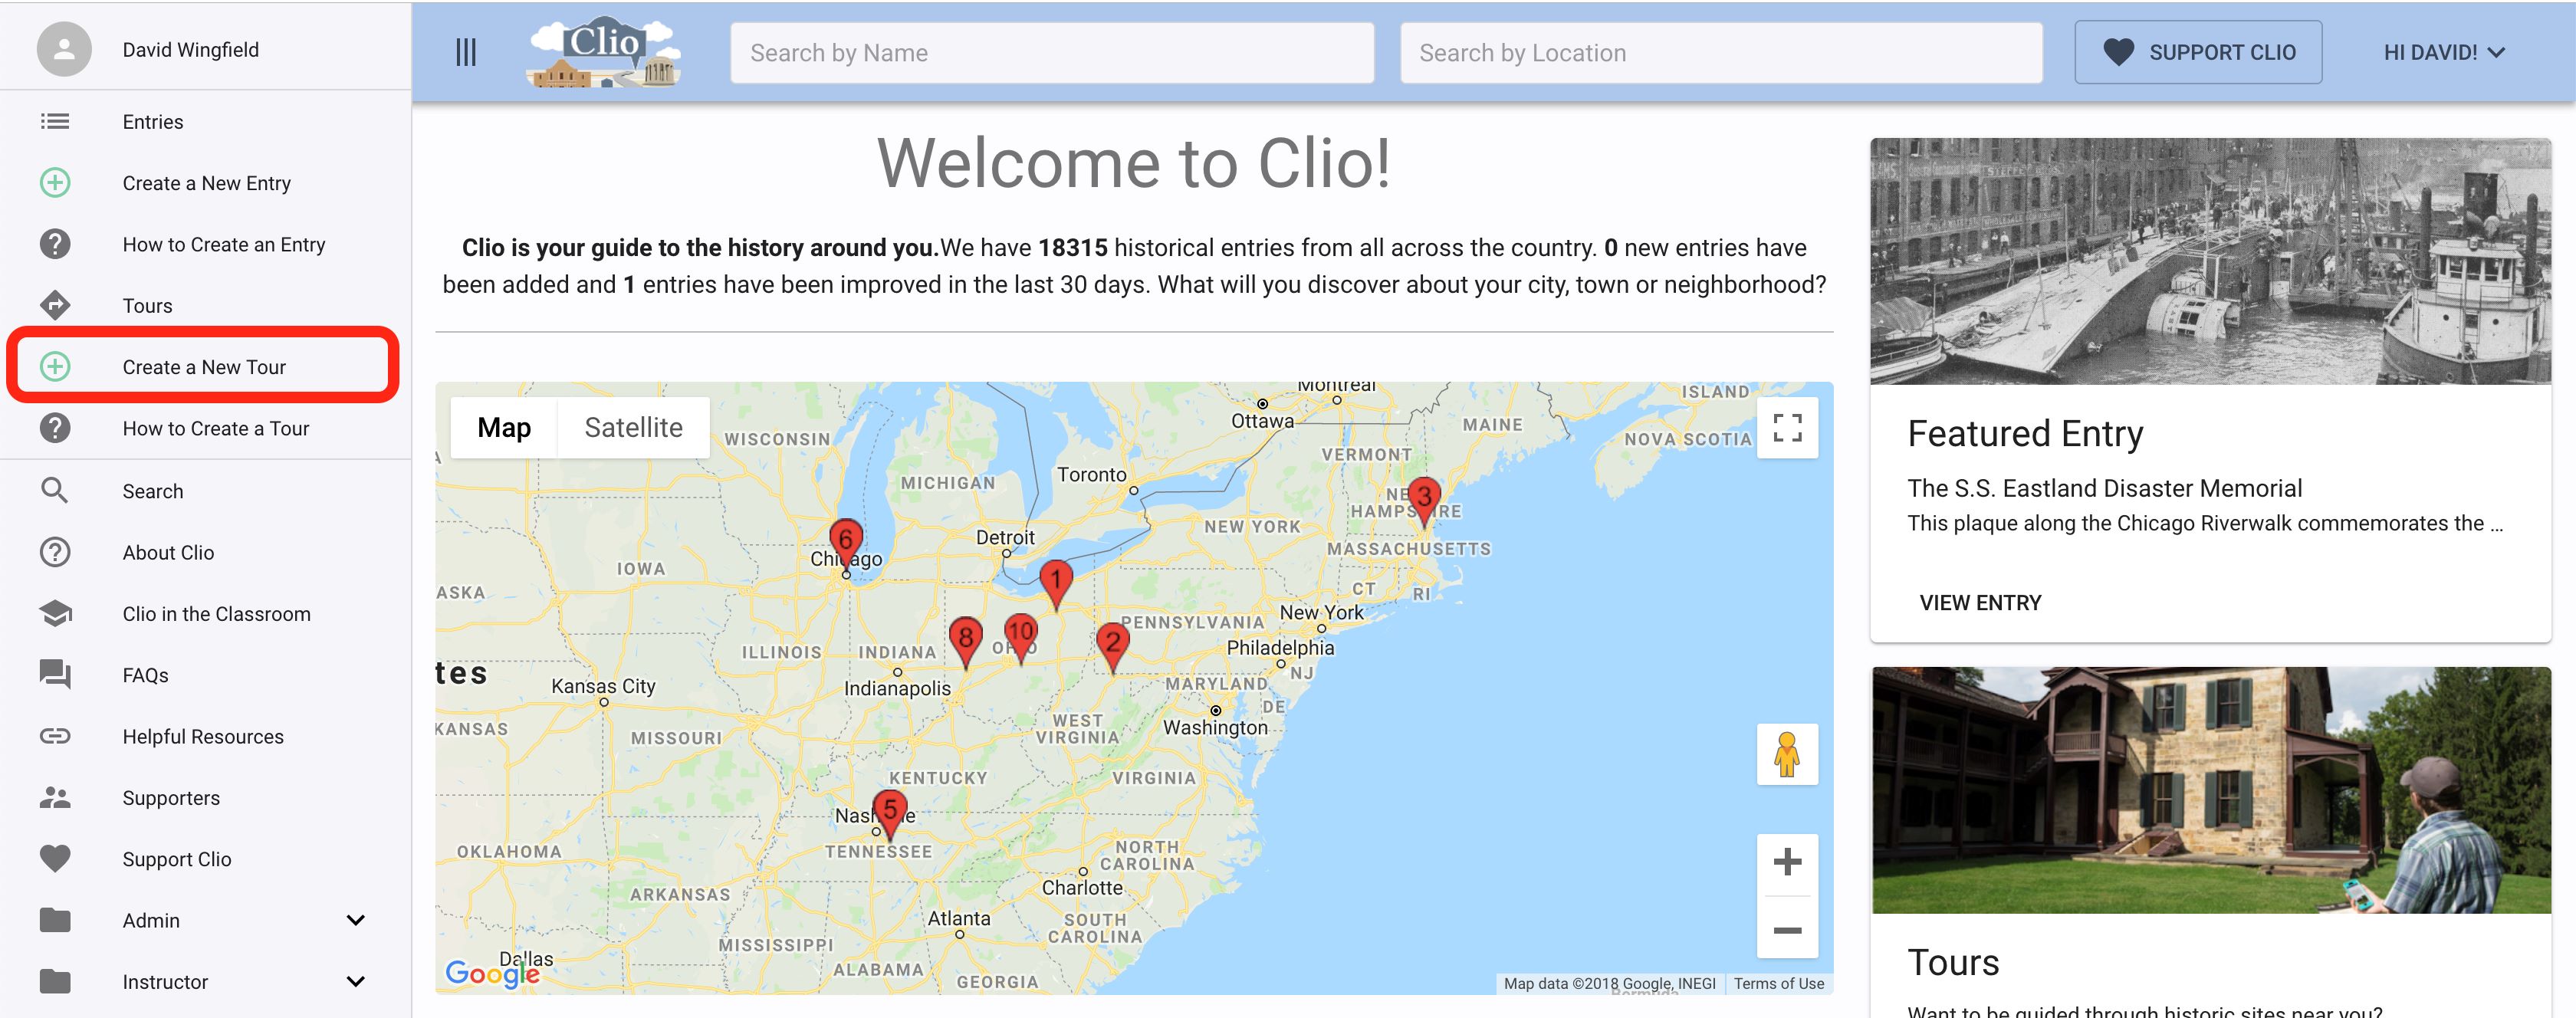
Step 1: Open the Tour Builder in Clio. Once you are satisfied with each of the entries, creating the tour or trail is s imple. Start by logging in to Clio and then click on the “Make Your Own” button next to the “Take a Tour” button.
You will select a location for your tour-either a location that is near your first entry or near the geographic center of your walking tour. Click the Green “Continue” button to get started.

Step 2: Select entries for the tour or trail. Click on the Green “+” button next to each entry you would like to include on the tour or trail. You will see each entry added to your working list of entries as you select them. If needed, you can deselect an entry by clicking on the red “-“ button next to each entry on the tour list.
Step 3: Edit the order of entries to create an ideal route. Clio allows you to edit the order of entries within a tour or trail to create the most logical route. Simply drag and drop each entry on the left-hand of the screen to alter the order of entries-you will see the list and the map update each time to help you visualize the route. You can also click the “up” and “down” arrows next to each entry.
In this example, we made entry #4 the first entry on the tour to create a more logical route. Clio uses Google Maps, and users can edit Google Maps to correct map errors or create sidewalks that will make it easier to create an ideal route for walking or driving. Click here for information about Google Maps.
Step 4: Add a name and description. After you are satisfied with the route, click on the green “Continue button. This takes you to the final step-adding a name and description and deciding whether you want to make the tour or trail public or private. The private tour function is ideal for creating a personalized itinerary that simply includes places you wish to see during a day trip. If you are creating a walking tour or heritage trail that is sure to appeal to a large audience, be sure to make you tour public and offer a compelling description of the tour in the overview section. When you are done, click on the green “Save Your Tour” button. That’s it!
FAQs:
WHAT IF I WANT TO CREATE A HERITAGE TRAIL THAT COVERS A LARGE DISTANCE? Clio is perfect for creating “virtual tours” that cover a large distance. Although few individuals may physically travel to each place along the route, these tours can offer tremendous value for educators. For example, a student might create a “History of Women’s Suffrage in Ohio Tour” that includes entries related to the efforts of suffragists in the 19th and early 20th centuries. Thematic tours might also allow users to explore topics such as the history of technology in Silicon Valley, labor history in Chicago, or civil rights marches and protests in Mississippi.
WHAT MAKES CLIO UNIQUE FROM OTHER HISTORY WEBSITES? Short answer: LOCATION, LOCATION, LOCATION People use Clio to discover nearby history, so location is everything. Start by searching for a building, marker, monument, or the precise location of a significant historic event. For example, rather than simply writing about the civil rights sit-ins in Birmingham, a Clio entry should be pinned at the precise location of a specific sit-in and include an image of the demonstration, a historic photo of the business where the protest occurred, or a photo of some of the participants. If no photos of the event can be found, the author might use an image of a newspaper story about the demonstration or some other image. Selecting a compelling image for the “location thumbnail” is critical to attracting readers.
Each Clio entry should tell a story and connect the history of a place or singular event into a larger narrative. Because Clio tells place-based stories, each entry MUST correspond to a place that can be identified on a map AND each entry must be “pinned” accurately on the map. For example, rather than writing a biography for a historical figure and placing it in the center of a town, the author should find the location of a historical marker or other landmark related to that individual. Begin with an introduction that discusses the history presented by that marker or represented by that landmark before shifting to the biographical details of the individual you want to focus on. In other words, start broadly with the history of a place before transitioning to the specifics. These details and connected narratives are ideal for the “backstory” section of the entry. When writing an entry for a marker or monument, please be sure to include the effort to create the monument or historical marker whenever possible. Sometimes this is the best part of the story.
Clio connects the public to humanities scholarship in a variety of ways. For example, this student is using Clio to watch digitized newsreel footage of a 1963 sit-in that occurred right where she is standing. The entry includes a concise description of the protest and its historical context, along with a link to an article on the sit-in in. The entry could also include links to oral histories from participants, links to websites about civil rights, and links to scholarly books about the movement in the region.
HOW DO I CRAFT THE PERFECT CLIO ENTRY? Each entry should begin with a concise overview that includes the most essential information. It is usually best to write this section after completing the larger narrative section, as this will allow you to include each of the highlights of your entry. This first paragraph is the MOST ESSENTIAL paragraph you will write. Write this paragraph with the expectation that some of your readers will only read this paragraph and the captions you provide for your images.
If your introduction is compelling, most readers will want to know more and continue reading your entry. This is where the “Backstory/More Information” section comes in. Without directly repeating the introduction, tell the full story of your entry in four to six paragraphs. (Please avoid longer entries, as this will actually discourage readership). Three paragraphs is an absolute minimum and eight paragraphs is the maximum.
This narrative must also be concise, well written, compelling, accurate, and based on thoughtful research and analysis. Always compose your entries offline so that you can save them and devote significant time to revision.
Entries should answer the basic questions of “who, what, where, when, why, and how. They should also address the question of “so what” by relating local events and local history into the larger narrative of a community, region, or topic in history. For example, an entry for a local labor strike should explain how this singular event was part of a larger history. The entry should demonstrate connections between events that preceded it, unique local issues, and the larger narrative of labor history in the region or nation.
Entries should also include at least a few images with captions, links to more information (credible articles, books, and primary sources) and properly-formatted sources. Entries can also embed audio and video files. At least one of the entries on the tour should include something unique that produced by the student such as scanned images from an archive, an oral history interview, or a short video.
Historical interpretation are seldom uncontested, so some of the entries should include contrasting perspectives about an event or its commemoration. Whenever possible, include information about how a place or event has been interpreted over time. Whenever possible, entries should offer current and historic images, links to related books and articles, and links to reliable websites where the public can learn more. Thousands of people use Clio each week as they travel or explore their own communities. As a result, each tour will reach a large audience. Please take this responsibility seriously.
WHAT KINDS OF ENTRIES CAN I CREATE? Each entry in the tour will fit one of three categories:
- Historic Sites and Landmarks--physical sites that exist in the present. These entries guide the public to an existing monument, historical marker, landmark, building, or public space. The entry will offer a concise historical interpretation of the site and its significance. For example, a student might create an entry for a monument to a civil rights leader that offers a brief biography, description of the effort to create the monument, and a discussion of the way that interpretations have changed over time.
- Museums, galleries, archives (self-explanatory)
- Time Capsule Entries-these offer a concise summary of a historic event and its interpretation or a former structure that no longer exists. Unlike category 1, however, there is nothing presently marking that location. Important-- the event can be “pinned” to a specific place on the map. For example, students might create an entry for a civil rights protest, even if the event has yet to be commemorated by a historical marker. They could also create an entry marking the location of a labor strike or the location of a historic building that no longer exists.
HOW DO I SHARE A WALKING TOUR OR HERITAGE TRAIL? Each individual entry, walking tour, and heritage trail has its own URL (web address) so you can easily share links to entries as well as tours/trails.